Why Does Render Crack? Common Causes and How to Prevent It
You spent good money on a fresh render coat, and a few summers later there’s a thin line snaking across the wall above the front door. Frustrating, but not always a sign of poor workmanship. The good news is render cracking is rarely random. After fifteen years working on Newcastle homes, I can usually tell what caused a crack within thirty seconds of looking at it. The trick is knowing what to look for.
This guide walks through the main render cracking causes I see on the tools every week, then covers what you can do to prevent wall cracks render systems are prone to, especially on coastal Aussie homes.
Why Does Render Crack in the First Place?
Render is really just a thin, brittle skin sitting on top of something that moves. Walls flex with temperature, foundations settle, and timber-framed builds shift seasonally. If the render can’t move with the substrate underneath, something has to give. That something is usually the render.
Three forces drive almost every crack we repair:
- Movement in the building or substrate
- Moisture getting where it shouldn’t
- Mistakes during the original mix or application
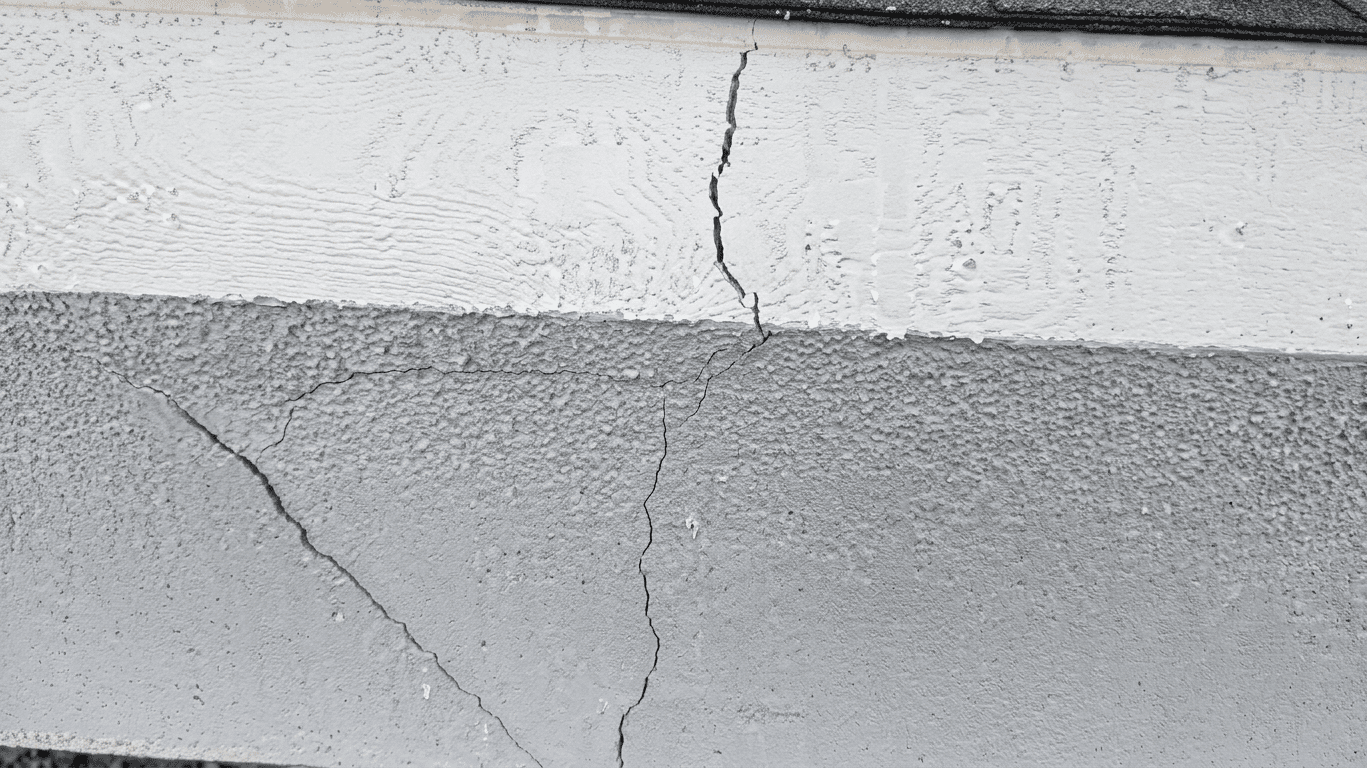
Most cracks tell you a story about which of these is happening. Hairline cracks usually point to shrinkage or surface stress. Wider diagonal cracks above windows usually point to structural movement. Stair-step cracks following brick joints almost always mean the wall itself is shifting.

The Most Common Causes of Render Cracking
Drying Too Fast
In a Hunter Valley summer, fresh render applied to a sun-baked wall can skin over in twenty minutes. The surface looks fine but the layer underneath hasn’t had time to cure properly. A week later, fine spider cracks appear right across the face. The fix is simple but ignored constantly: hose the wall down before you start and avoid rendering between 11am and 3pm on a hot day.
A Weak or Incorrect Mix
Too much sand, too little cement, or the wrong plasticiser will leave you with a render that has no tensile strength. We see this most often on DIY jobs and on rendering done by trades who took on a cement job without the right experience. The render goes on smooth enough, but it cracks within a season because the binder content was never high enough to hold the surface together.
Substrate Problems
Render bonds to whatever it’s applied to. If the underlying wall is dusty, painted, oily, or simply too smooth, the render will lose its grip. Old fibro, slick concrete blocks, and previously painted brick are the usual culprits. Proper surface prep with a bonding agent or scratch coat saves you a full repair job two years later.
Structural Movement
Settlement is the big one. Newcastle homes built on reactive clay soils, especially older builds in suburbs like Hamilton and Adamstown, shift slightly each season as the ground swells and dries. If the original render was applied as a rigid system without expansion joints, that movement transfers straight into the finish. Stair-step cracks following brick mortar lines are the classic sign that the wall, not the render, is the actual problem.
Salt and Moisture From Coastal Air
Homes within a few kilometres of the coast deal with constant salt-laden moisture. Salt crystals expand inside any micro-imperfection in the render, slowly forcing cracks open from the inside out. This is one reason why flexible acrylic systems and quality sealers matter more on coastal builds than inland ones. We see this pattern repeatedly on homes in Merewether, Bar Beach, and along the waterfront.
How to Prevent Wall Cracks in Render Systems
Prevention comes down to three things: substrate prep, the right mix, and giving the render time to cure properly.
A flexible acrylic top coat handles temperature swings far better than a straight cement render, which is why most modern coastal builds use a hybrid system. If you’re upgrading older render or starting fresh, our acrylic rendering services use flexible additives and weatherproof sealers designed for the Newcastle climate.
Other prevention basics worth knowing:
- Make sure expansion joints are cut into long wall runs
- Don’t apply render in direct sun or strong wind
- Use a mesh reinforcement over joins between different substrates
- Use the right primer or bonding coat on painted or sealed surfaces
- Keep gutters clear so water doesn’t constantly soak the render
Render Repair Solutions for Existing Cracks
Hairline cracks under a millimetre wide can usually be patched with a flexible acrylic filler and over-painted. Wider cracks need to be opened up in a V-shape, cleaned out, and filled with a structural compound before re-rendering the affected section. Anything wider than 5mm or running diagonally across a load-bearing wall needs a structural assessment first, especially if it’s reopened after a previous patch.

If your render is cracking across multiple walls and you can’t pin it to one cause, get a tradie on site rather than guessing. Contact Origen Projects for a free on-site inspection and honest advice on whether you need a patch, a re-render, or a full structural fix.